StudyPlace Set Up Process
This article will walk new schools through the process of setting up and configuring the StudyPlace system in preparation for the opening of their registration period.
There are 13 steps that comprise the process of initial system configuration. Each step is outlined below with a link to a How-To Video that demonstrates the procedure.
Step 1: StudyPlace Set Up Summary
(Watch How-To Video #1:
Summary)
The StudyPlace enrollment system was built to make the administration of your homeschool teaching organization easier and less time consuming.
While the StudyPlace user desktops are simple and intuitive to use, the system that powers it is quite complex. So this orientation will put things in context for you.
- Super Admins vs. Admins-
A Super Admin is a key person within the homeschool organization that can perform any administrative task or function within the StudyPlace system.
An admin is a person within the homeschool organization that typically handles registrations and other day-to-day operations.
Once GatherWorks announces that your database is ready for configuration they will provide the Super Admin with login credentials and a link to access the administrative desktop. Then the Super Admin can create the Admin accounts. The bulk of the set up procedures can then be performed by Admins. The exceptions are Steps 2 and 4.
Note:We recommend using Google Chrome as your browser for best performance.
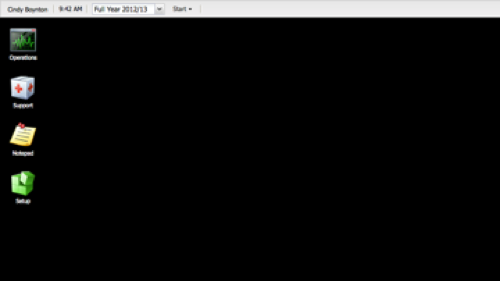
- Becoming Familiar with the Admin Desktop and Main Icons-
The main administrative desktop is designed to resemble a computer desktop and therefore we call it the Admin Desktop. It contains three main icons that are common to all schools: Set Up, Operations, and Notepad. Other icons may also appear as you “turn on” optional features. By far, the two most commonly used icons will be Set Up and Operations.
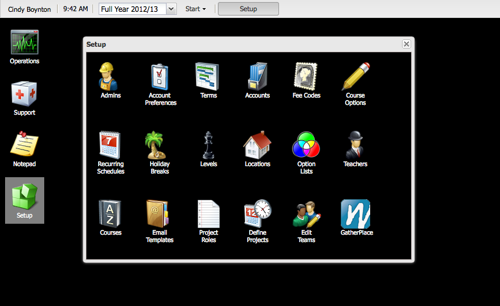
The Set Up icon is used for the initial configuration process. Here you will find everything you need to prepare your database for enrollment including setting up your terms, establishing fee codes, and entering course information.
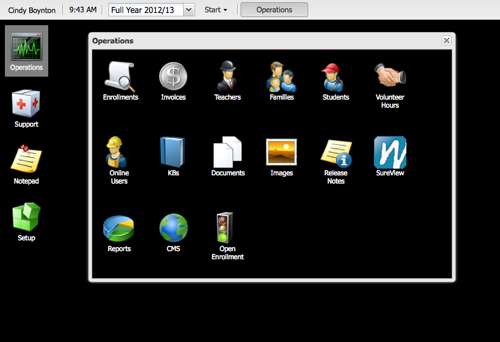
The Operations icon is where admins will spend most of their system time once the academic year is underway. It contains icons for day-to-day tasks including checking enrollment counts, monitoring over due invoices, accessing family and student account information, and much more.
- How to Approach the Set Up Process-
Since each step in the set up configuration process draws upon information entered in the previous step, it is important to follow the prescribed order below:
Step 1-Summary (Which you are reading now)
Step 2-Admins
Step 3-Setup Preferences
Step 4-Recurring Schedules
Step 5-Terms
Step 6-Accounts
Step 7-Fee Codes
Step 8-School Breaks/Levels/Locations
Step 9-Option Lists
Step 10-Teachers
Step 11-Courses
Step 12-Email Templates
Step 13-Family Service Jobs (Only necessary if your organization will be using the family service management feature)
- Division of Work-
There are 3 tasks in the initial set up configuration process that must be performed by Super Admin users. They are:
Step 1- Read this summary (Also important for Admin Users)
Step 2- Create admin accounts (Super Admin Only)
Step 4- Establish the Setup Preferences (Super Admin Only)
The rest of the set up process tasks can be delegated to Admin users.
A few things to to note about errors that you may encounter:
- If you receive an SQL error after entering information it means that the system is not accepting the information you entered. Even if it looks like your change was made initially, it will not be saved so do not continue. First, refresh your browser and then try the action again. If you still get an SQL error, then contact your GatherWorks representative to report it.
- If you see a red triangle appear in the upper corner of a field of information it is an indication that the system has not updated properly and needs to get back in sync. Refresh your browser and try again. If the red triangle appears again contact your GatherWorks representative.
- How to Import Course and Teacher Data-
Steps 10 and 11 deal with adding Teacher and Course information. It is important for you to know how to add teachers and courses into the system. However, if your information is already contained in an Access, MySQL, Excel or other such database GatherWorks can assist you with importing that data for the initial set up process. Contact your GatherWorks representative for assistance.
Note:Two things to note here:
- After the teacher accounts are created you can send an email with login information (See Teacher Welcome Emails)
- Once courses have been imported, admin will still need to link the courses with the other relevant information in the Edit Courses section such as levels, categories, fee codes, sections, locations, schedules, and teachers.
- The Testing Process-
Once all your information has been added to the system and you have completed your initial set up, it is time for you to become familiar with how the system works by creating fake family accounts and performing test enrollments and other operational tasks. This is done on the Test Server. It will look exactly like the production or real site except that the desktop color will be blue instead of black. So train your brain to know that blue equals test server and black is production server. That will enable you to test procedures in the test server before opening enrollment on the production server.
- Going Online-
After testing your system on the Test Server, you will be ready to go online and open registration. We will provide you instructions on how to enable registration and account creation. You will need to have a link added to your website that will refer your families to the StudyPlace login and account creation screen.
- The Family Experience-
Families associated with your homeschool organization will be required to create their own family account. The system will provide them access to their own enrollment and financial records. This will help to minimize the phone calls you receive from families asking questions about their account.
During the account creation process families will choose their own password, enter their contact information, and create student accounts. If the registration feature is also enabled, they will be able to search courses for students, select and add courses to their cart, and enroll their students in the courses. After their first enrollment they will be able to view their billing information.
- The Design Philosophy-
StudyPlace was designed based on the concept that every system transaction, whether it is initiated by a family, a student, a teacher, or an admin, should be kept as an audit trail to document the sequence of events that affect operations. Therefore, it follows, that many transactions cannot be deleted without the assistance of the GatherWorks support team. There may be cases where we will advise you to simply reverse the action (for example a credit can be reversed by adding a debit in the same amount) and other cases that will require our intervention in the back end of the system. Contact your GatherWorks representative if such a situation arises.
Back to list of Set Up StepsStep 2: Administrative Accounts
(Watch How-To Video #2:
Administrative Accounts)
Adding Administrative accounts is a function that
only Super Admins can perform.
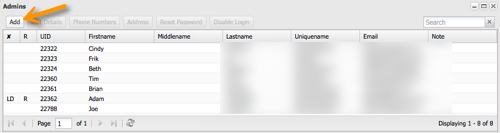
Once you login to the system and arrive at the admin desktop, click the
Admin icon.
Note:Note, the Admin icon is only visible to Super Admin users.
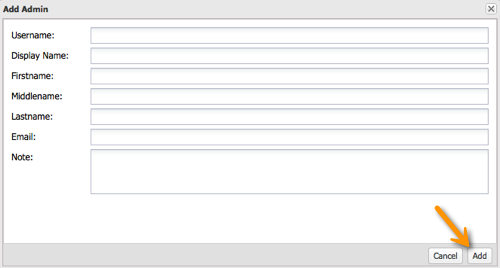
To add an admin user, click the
Add button then complete the form.
When you are done click
Add at the bottom of the form.
To assign the admin user a password, select their name and then click the
Reset Password button.
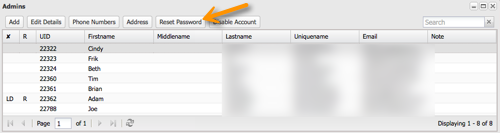
Enter a password of your choosing, but keep in mind that passwords must be 6 characters and include both letters and numbers with no spaces. Then click OK.
Note:Once you click OK their password will no longer be visible to you. So it is important to immediately email the admin user to provide them with their login credentials. They will need their username as you entered it in the ADD form and the password that you just created.

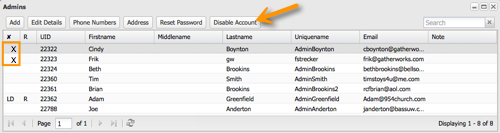
To disable an admin account, select their name and click the disable account button. An X will appear next to the person’s UID number to indicate that their account has been disabled.
Note:When an account has been disabled the user is no longer able to log into the system.
 Back to list of Set Up Steps
Step 3: Setup Preferences
(Watch How-To Video #4:
Setup Preferences)
Note:"Setup Preferences" was formerly known as “School Preferences” and “Account Preferences."
The StudyPlace system was designed to accommodate the differences between schools when it comes to things like policies, fees, and the use of some of the features we provide.
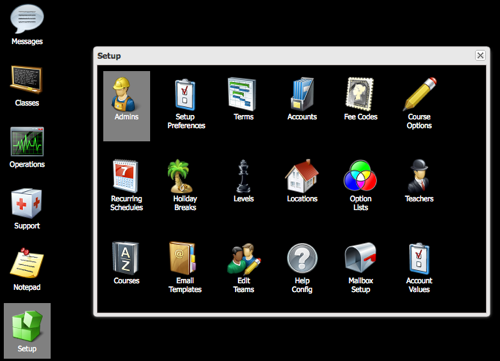
To configure your Setup Preferences, go to the main administrative desktop and click
Set Up and then
Setup Preferences.
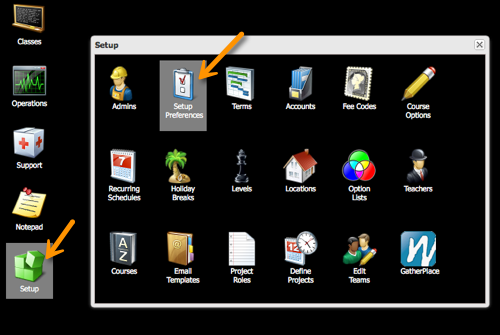
You are automatically brought to the
Info tab, but there are 7 more.
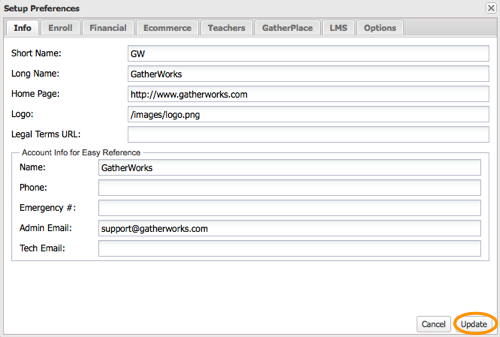
Tab 1-InfoThis is where you enter all your contact information including school short name (acronym), full name, website homepage URL, and path documentation for your uploaded logo and school terms. (See image below)
In the logo and legal term fields, enter the image or document paths assigned to the logo and legal terms after uploading them in the CMS Image manager. (How-To Video:
Uploading Images and Documents )
Then click
Update to save the information on tab 1.
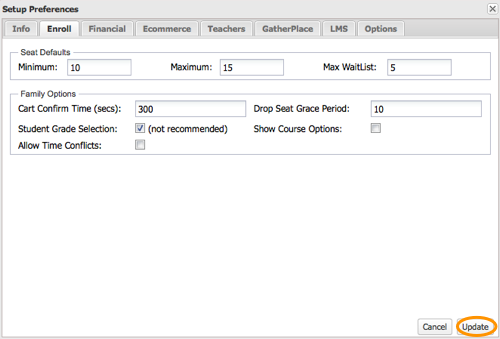
 Tab 2-Enroll
The information you enter here will set course seat default values, seat reservation time for the registration process, the drop seat grace period for families, and a few other options. (See image below)
The numbers you enter for the
Minimum/Maximum/Maximum Waitlist will be default values only and can be changed for specific sections in the Course Set up section. Here we advise you to enter the numbers that are typical for most of your courses or sections.
The
Cart Confirm Time is where you enter the amount of time (in seconds) that you want to allow families to keep a reserved in a course during the enrollment process before they must either confirm the reservation or cancel it. Generally we advise 300 sec or 5 minutes.
The
Drop Seat Grace period is the period of time (in days) that families can drop seats in which they have enrolled their students. After the grace period, families need to contact the school to perform the drop.
Check the box for
Student Grade Selection if you want to gather grade placement information from families during the family account creation process.
Check the box for
Show Course Options if you have special options (i.e. discount prices or honors level price adjustments) that families may need to use during the enrollment process.
Check the box for
Allow Time Conflicts if you want families to be able to enroll in seats that are offered at the same day/time. (Some schools allow this to enable families to keep their student on a waitlist for one course and enroll in another course as a back up just in case the waitlisted seat doesn't become available.) Keep the box unchecked if you do not want to allow this.
Click
Update to save the information on tab 2.
 Tab 3-Financial
The information here sets fees and terms and prescribes important payment information to be disseminated to families. (See image below)
First, in the
Bounce Fee field, enter the amount in dollars that you want to charge families if their checks bounce. You do not need to enter the dollar sign. If you don’t charge for bounced checks enter 0.
Then in the
Bounce Fee Description field, enter the description you want to use in family auto emails and billing views to refer to bounced checks. Here we are using the term non-sufficient funds.
Then in the
Make Checks Payable field, enter what checks should be made out to and then below the mailing address for payments.
In the field for
Invoice Collect Amount, enter the minimum amount of money that your organization will invoice families for. Anything less than the number you enter here will not generate an invoice. I’ll enter 10 dollars.
In the field for
Invoice Refund Threshold, enter the minimum amount of money that your organization will refund families for. Anything less than that number will not generate a refund. I’ll enter -5 dollars.
Check the box for
Send Invoice Emails if you want to use automatic email templates to issue family invoices.
In the field for
Payment Terms Actual enter the number of days that families actually have to submit payment after they enroll. Here we’ve entered 12 so after 12 days the system will start sending past due notices.
In the field for
Payment Terms Shown enter the number of days that families have to submit payment after they enroll in a course. Here we’ve entered 10.
The difference between what is shown and what is actual allows schools extra time for internal processing to enter checks that may have come in on the 10th day.
In the field for
Drop Seat Fee enter the fee your school charges after the drop seat grace period (entered earlier in the enrollment tab) if a family drops a seat. Or use "-1" to use the recommended $1 per day drop seat fee based on how long a seat was held.
Click
Update to save the information on tab 3.
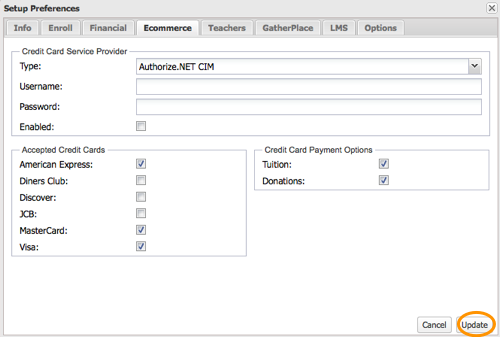
 Tab 4-E-Commerce
This tab controls credit card transactions if you want to accept credit card payments. GatherWorks uses the Authorize.net CIM service to provide this feature. Contact your GW representative if you would like us to consider another service.
The first thing you need to do in order to set up your organization to accept credit card payments from your families is to create an account with Authorize.net. This process involves submitting paperwork to them. Once they approve you, they will issue you a username and password. Please see the Knowledge Base article
Using E-Commerce in StudyPlace for more information on creating an Authorize.net account.
Once you have your username and password, you are ready to complete the information here in the Ecommerce tab.
At the top in the
Credit Card Service Provider section, choose Authorize.net in the drop down menu of the type field.
Then enter your username and password that Authorize.net issued you.
Click in the
Enabled checkbox to enable the credit card transactions
In the
Accepted Credit Card section, click the check boxes for the type of credit cards that you accept.
In the
Credit Card Payment Options section,
- Click the checkbox for Tuition if you want to accept credit card payments for tuition
- Click the checkbox for Donations if you want to accept credit card payments for donations to the organization.
- Leave the boxes unchecked if you don’t want to accept cc payments for that particular purpose.
Then click Update to save the information and close the window.
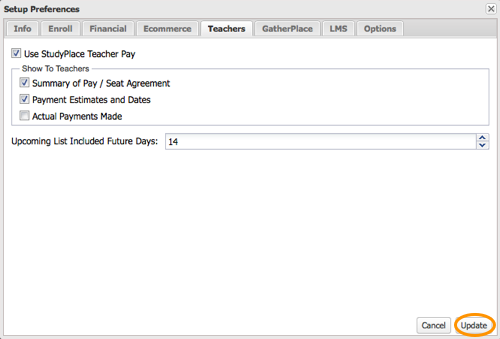
Tab 5-Teachers
Use these checkboxes if you want StudyPlace to provide teacher payment information and if you intend to use the system to track what is owed to them, what has been paid to them, and when the payments will occur.
To enable the Teacher Pay features, check the Use StudyPlace Teacher Pay checkbox.
In the "Show to Teachers" section:
Checking the Summary of Pay/Seat Agreement box will display a Section Pay icon in the Reports menu of the Teacher desktop.
Checking the Payment Estimates and Dates box will display a Pay Estimate icon in the Reports menu of the Teacher desktop.
Checking the Actual Payments Made box will display a Actual Payments icon in the Reports menu of the Teacher desktop.
Keep 14 in the Upcoming List Included Future Days field.
Click Update to save the information and close the window.
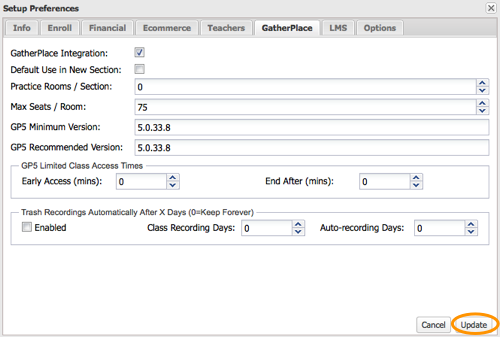
Tab 6-GatherPlace
This tab is used for organizations that wish to use StudyPlace in tandem with GatherPlace (our web conferencing system) to teach courses online.
Check the box for GatherPlace Integration if you want to enable the integration.
Check the box for Default Use in New Section, if you want to enter information that will be used by default everytime you open a new section.
In the Practice Rooms/Section field enter the number of practice rooms you want to designate to each section.
In the Max Seats/Room field, enter the maximum number of seats you want to allow for each course section room.
In the GP5 Minimum Version field, enter the minimum version number that you want each teacher and student to use for access into the course section room.
In the GP5 Recommended Version field, enter the recommended version number that you want each teacher and student to use for access into the course section room. Gatherworks will make a recommendation to you for both the minimum and recommended version.
Under the [bGP5 ]Limited Class Access Times[/b] section, enter the number of minutes before and after class that students may enter or stay in the room in the Early Access field and the End After fields.
Under the Trash Recordings section, check Enabled checkbox if you want to allow the automatic deletion of recordings. If you check the box, then enter the number of days after a class recording that the recording will be deleted in the Class Recording Days. In the Auto-recording days field enter the number of days after an auto recording that it should be deleted. Note that entering a zero means the recording will never be deleted.
Then click update to save and close the window.
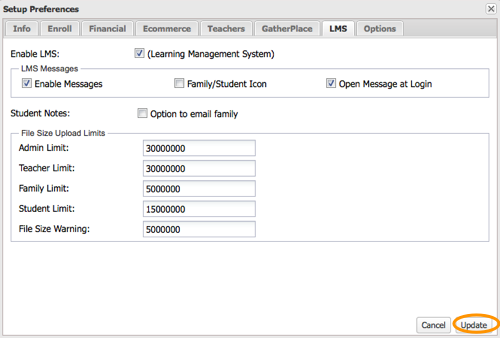
Tab 7-LMS
The Learning Management System (LMS) will allow organizations to build course content online including homework, tests, and grading.
Check the Enable LMS box to enable the feature.
Under LMS Messages, check the Enable Messages box to enable the bulletin board Messaging system.
Check Family/Student icon if you want Messages to show when families and students log into their account.
Check Open Messages at Login box if you want the Messages to open automatically upon login. Keeping this unchecked will mean that families and students will need to open Messages manually to read the messages.
In the Student Notes section, check the Option to Email Family box if you want the student notes that teachers and admin enter into the system to be copied to the family.
File Size Upload Limits for Admin and Teachers should be set for 30 million bytes or 30 megabytes and for Family and File Size Warning it should be 5 million bytes or 5 megabytes, and the student limit should be 15 million bytes or 15 megabytes.
Then click update to save and close the window.
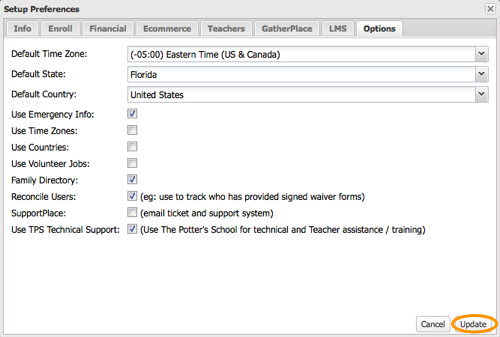
Tab 8-Options
The information in this tab controls and sets default values for certain features in the system.
The first 3 items are drop down menus where you can select your defaults for Time Zone, State and Country if you use those features.
The other items are check boxes where you select which features you want to use.
If the school wants to collect emergency information for all students, check the Emergency Info box. If you are an online school, maybe you don’t need it.
If you are a physical school that enrolls students who all live in the same Time Zone and Countries and you may not need to have those fields entered or shown in all enrollment fields. If that is the case, you can turn off those fields by leaving the boxes unchecked.
If you are a school that offers online classes then Time Zone and Countries and fields would be important to keep. So you would check the boxes.
If the school has volunteer jobs for families, then they would check the box for Volunteer Jobs. If you don’t offer volunteer jobs, keep the box unchecked.
If you want to use the family directory and allow families to opt out of it, check the Family Directory box.
If you need a way to reconcile users with forms submitted by hand in hard copy form, check the Reconcile Users box.
If you want to use the SupportPlace ticketing system to track requests from students and families, then check the SupportPlace box.
Back to list of Set Up Steps
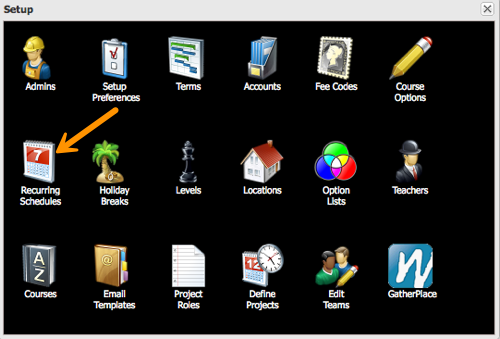
Step 4: Recurring Schedules
(Watch How-To Video #5: Recurring Schedules)
This tool can be used to create volunteer schedules, club schedules, or class schedules. But the first priority for new StudyPlace users is to create recurring a class schedule which will populate a list of time slot options for you to select when you add courses.
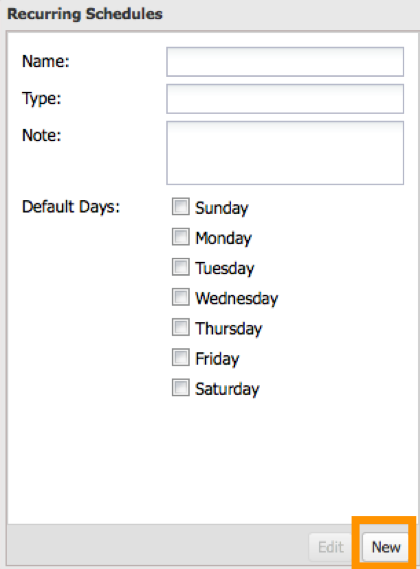
Start by clicking the Recurring Schedules icon on the Administrative desktop.
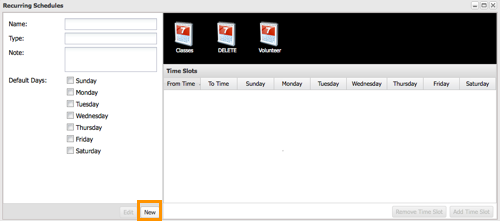
Then click the New button on the left side of the window.
Then enter the Name of the schedule, such as "Classes." For the Type field, use the drop down menu to choose either a class schedule or a project (volunteer) schedule. Then put a check mark in the box beside the days of the week that your schedule will cover. The system default is to select every day of the week so if your classes only meet on Tuesdays and Thursdays, uncheck the other 3 days. Then click Save.
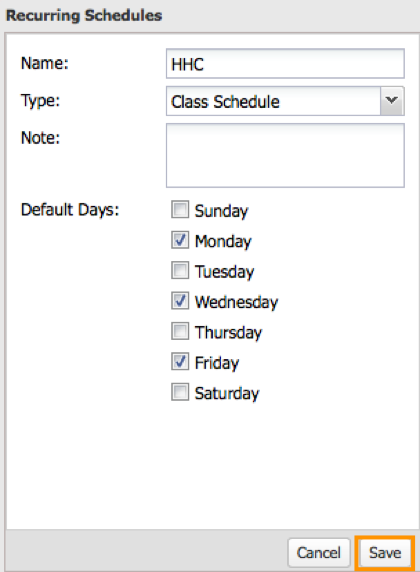
That will generate an icon in the black field.
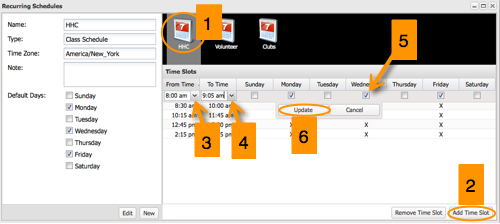
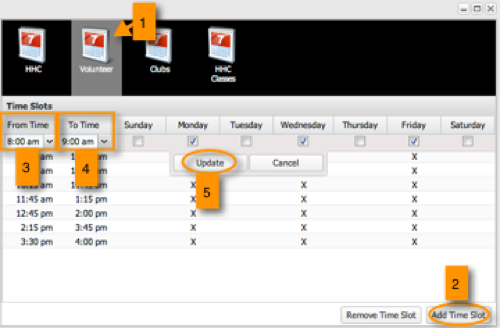
- Choose that new icon by clicking it.
- Click the Add Time Slot button. This will allow you to enter the time slots for each period of classes that you offer. For instance if you offer classes every 90 minutes throughout the day you need to add a time slot for each of those periods.
- Select the beginning time.
- Select the end time.
- The correct days of the week will be checked already since it was defined in the previous step.
- Then click Update. Repeat the process to enter all time slots.
Back to list of Set Up Steps
Step 5: Terms
(Watch How-To Video #6: Terms)
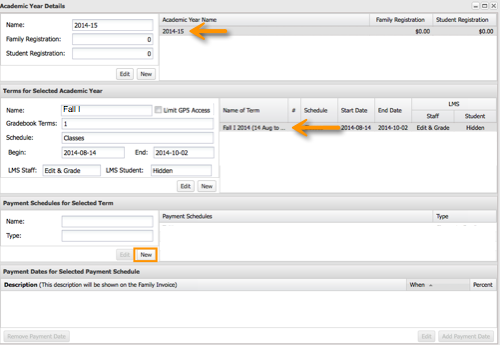
It may help to visualize a hierarchy or family tree. At the top you have the Academic Year. From there it branches out to separate terms in the Academic year. Below that each term branches out into individual payment schedules and lastly each payment schedule branches out into specific payment dates.
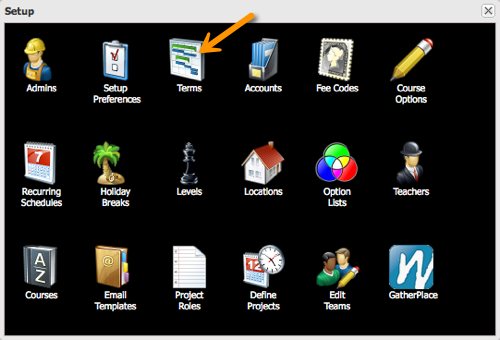
At the main desktop screen for administrative personnel, go to Set Up and click Terms.
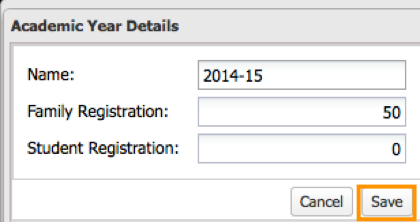
Setting Up Your Academic Year- Click New under Academic Year Details (see below)
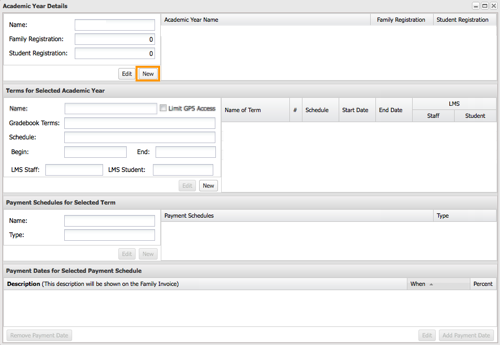
See image below:
- Enter a name for the academic year in the name field. This name will be visible to families and used as part of the payment details so keep it short and family friendly. Consider using your acronym and the year like (HTS 2012/13).
- Below enter the family registration amount which is charged per family per year upon the first enrollment.
- Next enter the student registration amount if applicable. This amount will be charge per student per year upon the first enrollment.
- Then Click Save. This will generate an entry line for the Academic Year in the field to the right.
Setting Up Your Terms for the Academic Year- Select the Academic Year line you just created in Academic Year Details (see below)
- Click New under Terms for Selected Year (see below)
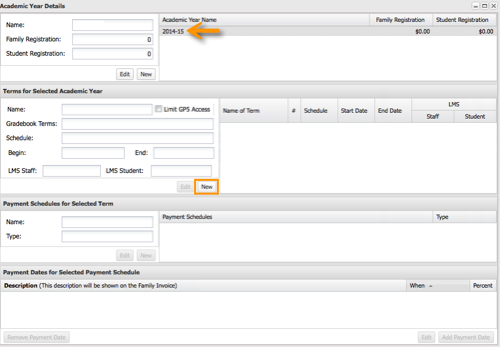
See Image Below:
- Enter a name for the term in the name field such as (Fall/Spr 2013/14),
- In the Gradebook Terms field, enter the number of times grades will be provided to families during the term.
- Choose a schedule from the drop down list. The list of options is generated from the recurring schedules that have been entered.
- Enter the first and last days of school in the term beginning and end date fields. Do not include possible make up snow days in these dates.
- Set the staff visibility and access mode for courses in this term by clicking the down arrow and making a selection from the drop down list.
- “Hidden” will hide the courses in this term from staff while admin are getting them ready;
- “View Only” will display the courses to staff, but will prevent editing;
- “Edit (Hide Dates)" will allow staff to edit their courses in this term by meeting number, but not dates;
- “Edit & Grade” will allow staff to edit and grade their courses in this term and dates will be visible;
- “Final” will allow staff to see the final results of the courses in this term, but will prevent them from changing or adding grades.
For this point in the set up process, it is best to select “Hidden.” - Set the student visibility and access mode for courses they are taking in this term by clicking the down arrow and making a selection from the drop down list.
- “Hidden” will hide the courses in this term from students while admin and teachers are getting them ready;
- “View Only” will display the courses to students, but will prevent students from being able to submit assignments;
- “Can Submit” will allow students to start submitting assignments.
For this point in the set up process, it is best to select “Hidden.” - Click Save and the new term entry will appear in the field to the right.
- Repeat this process for additional terms. For instance you may have classes that meet for only half the year or a summer term.

Setting Up Your Payment Schedules for Each Term
It’s important to understand that there are two types of payment schedules in StudyPlace:
- A schedule of dates for when families pay you
- A schedule of dates for when you pay teachers
- Select an entry line in the Academic Year field (see below)
- Select an entry line in the Terms field (see below)
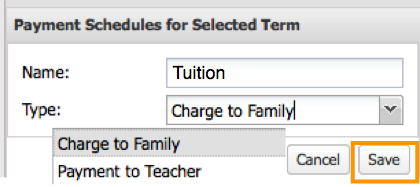
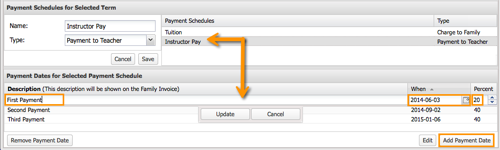
- Click New under Payment Schedules for Selected Term (see below)
See Image Below:
- Enter a name for the payment schedule in the Name field. For instance, Tuition 2013/14
- Choose the type of payment schedule from drop down list. If this is a payment schedule for a tuition or a fee then choose Charge to Family. If it is a payment schedule for teacher compensation choose Payment to Teacher.
- Click Save and an entry line will appear in the field to the right.
- Repeat the process to add all the payment schedules for each term. For instance, each term may have a payment schedule for tuition, another one for teachers, and another for resource fees.
Setting Up Your Payments for each Payment ScheduleNote:Please note, that each payment schedule must account for 100% of the amount owed, but can be spread over multiple dates.
- Select an entry line in the Academic Year field (see below)
- Select an entry line in the Terms field (see below)
- Select an entry line in the Payment Schedules field (see below)
- Click Add Payment Date (see below)
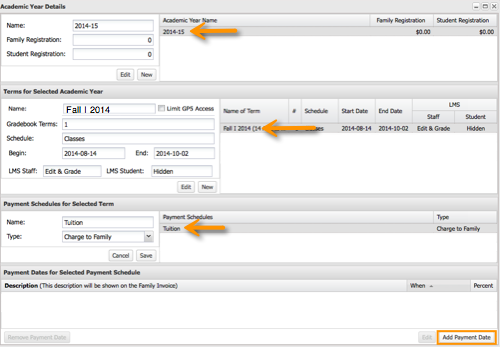
See Image Below:
- Enter description for the payment such as (initial tuition payment),
- Choose a due date in the calendar,
- Use the arrows to enter a percentage of the total amount owed that will be due on that particular date.
Note:Note, that for tuition payment schedules the first date should be left blank which will trigger the system to charge the amount immediately upon registration. Commonly, tuition will have multiple dates, but resources and other fees are charged immediately for the full amount. The dates (no matter whether there is one or more) should all add up to 100%.
- Click Add Payment Date
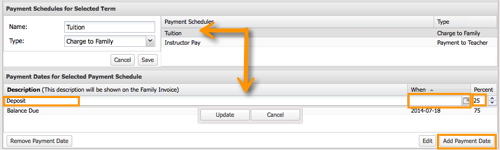
- Repeat for additional payment dates for each payment schedule
 Back to list of Set Up Steps
Step 6: Establishing Accounts
(Watch How-To Video #3:
Establishing Accounts)
Think of StudyPlace accounts like bank accounts. Accounts for Tuition, Registration, and Tuition Assistance, and Donations are automatically created for you. While new accounts are created every year for Tuition, Registration, and Tuition Assistance (the previous year’s accounts will remain for archival purposes), the Donations account is only created once and remains in use perpetually. Transfers can be made from the Donations account to the Tuition Assistance account as the organization sees fit. Fee codes, which you will set up in the next step, will be linked to these accounts as well as any others that you may need to establish for your organization. The fee codes and accounts are used to track money that is collected.
There may be additional accounts that you need to create for your school. If, for example, you charge families for Resource Fees (books, lab materials, page copies, etc) you should establish an account for each vendor. For example, each book vendor should have its own account for proper allocation. The vendor accounts will also cope with adds and drops throughout the term and adjust what is owed accordingly. In this way, you can avoid over or underpaying your vendors.
Follow the instructions below to establish an account.
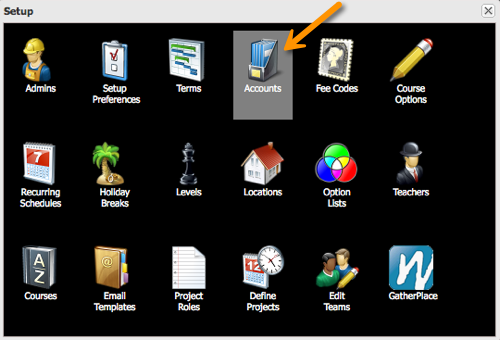
Once you login to the system and arrive at the admin desktop, click the
Accounts icon.
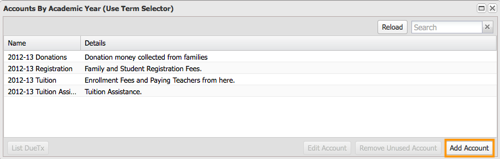
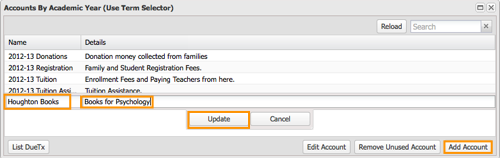
To create an account, click the
Add New Account button.
Then enter a name for the Account and details for the account that will be helpful for you to identify what money will go in there. Then click
Update.
To make a change to an account, select it and use the
Edit Account button. To delete an account, select it and use the
Remove Unused Account and then click
Yes in the confirmation box.
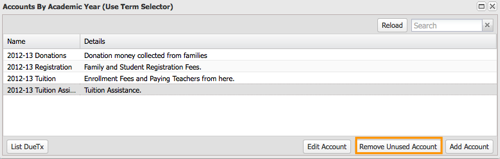
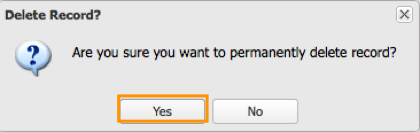
Note:Note: the system will not allow you to remove an account that has money in it.
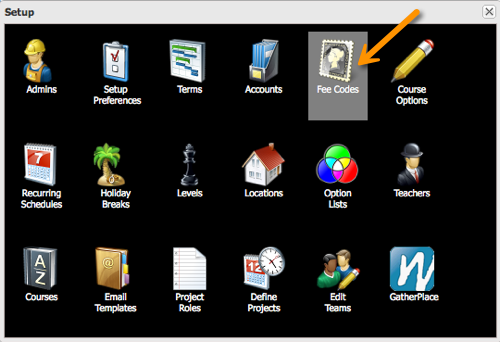
Back to list of Set Up StepsStep 7: Fee Codes
(Watch How-To Video #7:
Fee Codes)
Fee codes are used to track tuition and resource fee money and to provide a time-saving method of making pricing changes.
It is important to keep in mind that:
- Fee codes must be established for each Term.
- Fee codes must be linked to an account.
- Fee codes cannot be easily changed once enrollments are associated with it.
- A naming convention should be chosen for your fee codes before you begin this process. (More about this below)
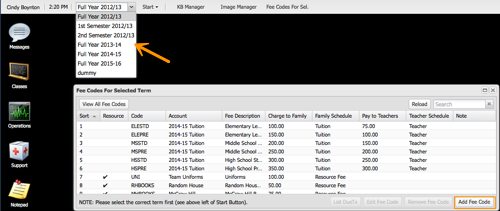
At the main desktop screen for administrative personnel, go to Set Up and click Fee Codes.
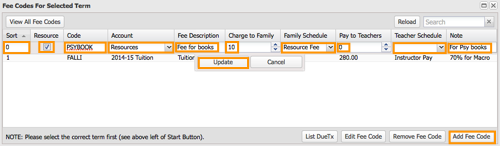
To create a fee code,
- Select a term in the field to the left of the start button.
- Click the Add Fee Code button
- Use the Sort Column to enter the sort order for the fee codes. If you want it to appear first, enter a 1. (If it’s easier you can do this after you’ve entered all your codes)
- Click the box in the Resource column if the fee code is for a resource fee. Leave it blank if it is not
- Enter a Code name for this fee code.
Note:It is important to choose a naming convention for your fee codes and we recommend that you include a reference to the term in each fee code name. For instance, you could choose HSFY to signify a High School level course in the Full Year term or ELES to signify an Elementary level course in the Summer term. Be sure to always end your fee code name with an abbreviation for the term, in these examples I used FY for full year and S for summer.
- In the Account column, click the arrow in the drop down menu and select an account that the code will be associated with
- Enter a brief description of the fee
- Enter the amount of the Charge to the Family for this fee code
- In the Family Schedule column choose the appropriate payment schedule to associate with this fee code
- Enter the amount of the charge to families that will be used to Pay the Teacher. For instance if the charge to the family is 200, decide what portion of that amount will pay the teacher and enter it here. If the fee code is for a resource fee enter 0.
- In the Teacher Schedule column choose the appropriate payment schedule to associate with this fee code. For resource fees, leave the teacher schedule column blank.
- Enter Notes if necessary
- Then click Update
- Repeat for additional fee codes in the selected term
- Then go and select the next term and follow the same process to enter fee codes for that term
Note:Please note that you cannot change a code that is already associated with courses that have enrollments. If you try to you will get an error message. To cope with this situation you will need to go through a special process of removing the old code and adding a new code.
Back to list of Set Up StepsStep 8: Breaks/Levels/Locations
(Watch How-To Video #8:
Breaks/Levels/Locations)
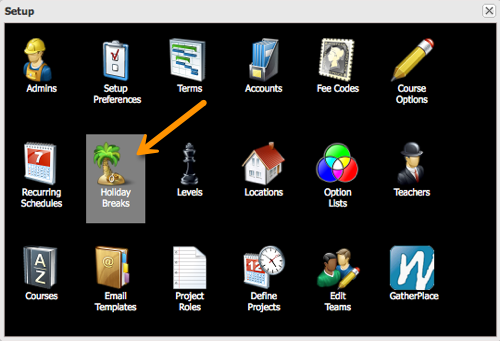
At the main desktop screen for administrative personnel, click Set Up.
Breaks and HolidaysTo enter your breaks and holidays, click the
Breaks icon.
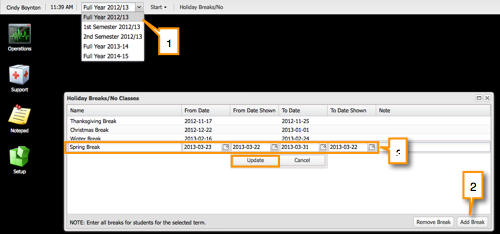
The purpose here is to provide the system with exceptions for your recurring schedules. So enter the dates within the term you selected that classes will
not be meeting.
- To the left of the Start button, select your Term.
- Then click the Add Break button.
- Enter the name of the holiday/break, then choose the beginning and ending dates for what you want to show on your school calendar page as well as the actual dates for system purposes. (The Date Shown fields are not required.) Click Update.
Then repeat for additional dates within that term. To delete an entry, click on it and then use the
Remove Break button. When you are done with that term, you can select a different term and repeat this process. When you are done, close this window.
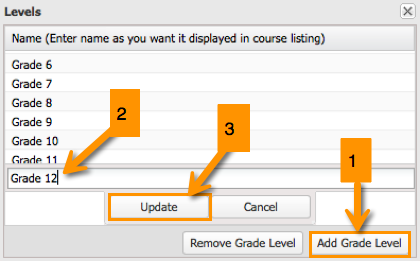
 Levels
 To enter your grade levels, click the
Levels icon.
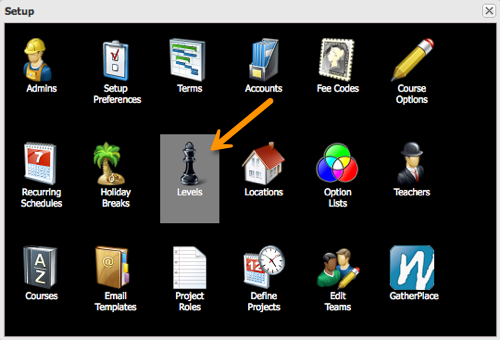
The information you enter here will enable families to search or filter course selections for specific grade levels.
- So click the Add Grade Level button
- Enter name of the grade as you want it displayed in course listings
- Then click Update
- Repeat for each grade.
To delete an entry, select it and then use the
Remove Grade Level button. When you are done, close this window.
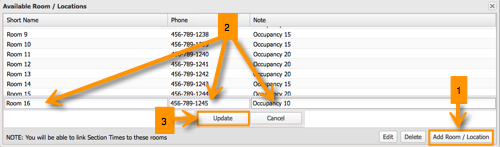
Locations If your organization holds classes at a physical campus as opposed to offering only online courses, then you will have to enter class locations. Click the
Locations icon.
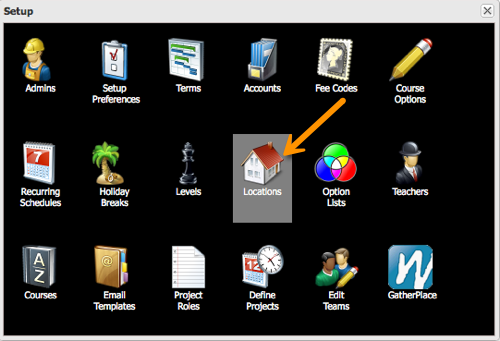
This information will populate an option list menu used when you add a course.
Note:Homeschool support organizations that only offer online courses may skip this step.
- Click the Add Room/Location button.
- Enter the Room Name such as Room 10, the Phone Number for the room if applicable, and any notes that you may find helpful such as room capacity or equipment.
- Then click Update.
Repeat this process for each classroom location
 Back to list of Set Up Steps
Step 9: Option Lists
(Watch How-To Video #9:
Option Lists)
At the main desktop screen for administrative personnel, click
Set Up and then
Option Lists.
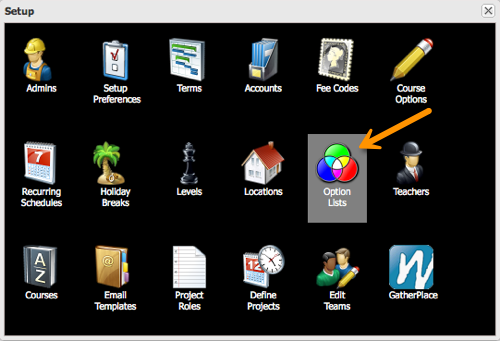
Option lists are used to populate menu options within the system. There are many applications, but generally homeschool organizations will use it to define what will be listed in the course category drop down menu, a task that should be done during the initial set up process. There are two steps involved in creating course category options:
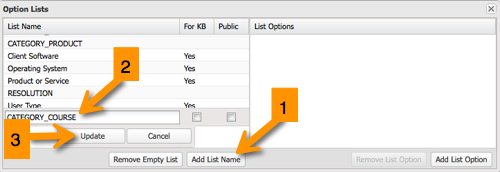
First we need to add a list:
- Click the Add List Name button on the bottom of the left panel.
- Enter name of the list: CATEGORY_COURSE
- Click Update
If you made a typo, you can always double click the entry to edit it and then
Update.
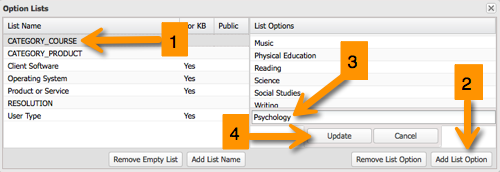
Second, we need to add options for the list we just created
- So Select the list name on the left that you just entered
- Then on the right, click the Add List Option button
- Enter the name of the option to appear in the list category you just defined.
- Then click Update
Repeat the process to add additional list options
Note:The system will not allow you to delete a list that has options associated with it. So if you need to delete a list, you must first remove all the associated options using the Remove List Option button on the right. When all of the options have been removed, elect the list name on the left and use the Remove Empty List button to delete it.
Back to list of Set Up StepsStep 10: Teachers
(Watch How-To Video #10:
Teachers)
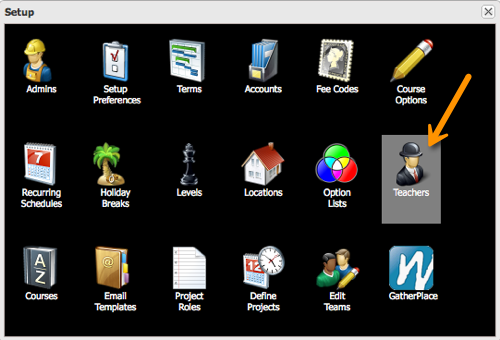
At the main administrative desktop, click the
Set Up button and then
Teachers.
During the initial set up configuration process GatherWorks may be able to import your teacher information for you, eliminating the need to enter them into the system manually. Contact your GatherWorks representative for more information on that.
Even if we are able to import your teacher data, it is still beneficial to know how to do it yourself as new teachers may need to be added after the import.
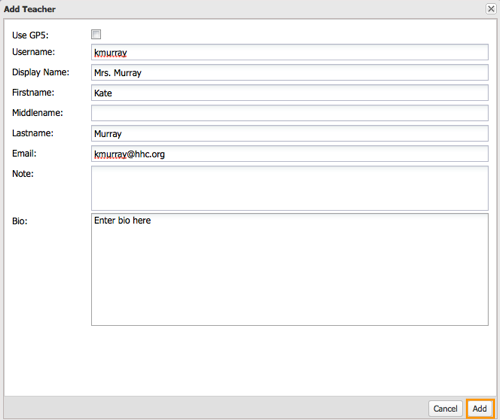
To add a teacher simply click the
Add button.
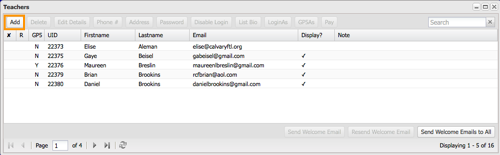
Then complete the form. (We recommend using the first part of the teacher’s email for the teacher’s username. The display name will be used to refer to the teacher within the system.) When you are done click the
Add button.
Note:Very Important: If teachers are also parents of students enrolled in your organization, be sure that the email addresses used for their teacher accounts are not the same ones that will be used for their family accounts. We recommend that teachers use an email address supplied by the organization for their teacher accounts.
To disable a teacher account, select their name and click the
Disable Account button.
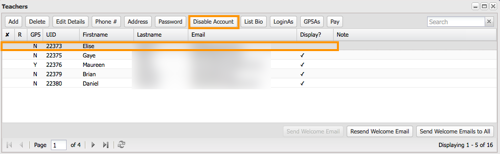
An X will appear next to the person’s UID number to indicate that their account has been disabled.
Note:Note, when an account has been disabled the user is no longer able to log into the system.
After adding all your teachers to the system, you will need to send them a Welcome Email with instructions on how to login and set their password.
Before doing this you must edit the Email Template that is used for the Welcome Email. Full instructions on Email Templates are included in Step #12, but for this singular purpose, please check with your StudyPlace representative to review and edit the contents of the message. Once the template is ready, click the “Send Welcome Emails to All” button to trigger an email to be sent to each of the teachers you entered.

Later, if necessary, you can select individual teacher names in the list and individually resend the Welcome Email to him/her using the “Resend Welcome Email.” Use the “Send Welcome Email” button when you add additional teachers throughout the year.
Back to list of Set Up StepsStep 11: Courses
(Watch How-To Video #11:
Courses)
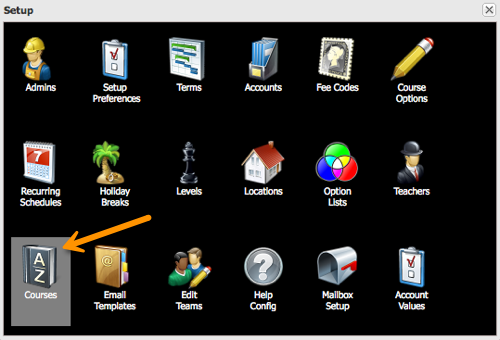
Click
Set Up on the main administrative desktop and then click the
Course icon.
To add a course, click the
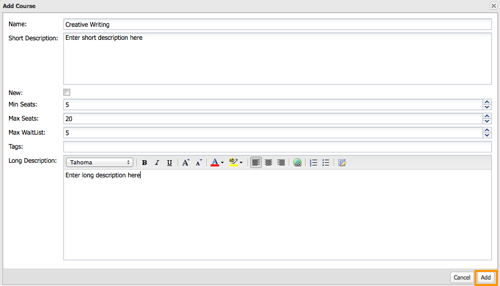
Add Course button.
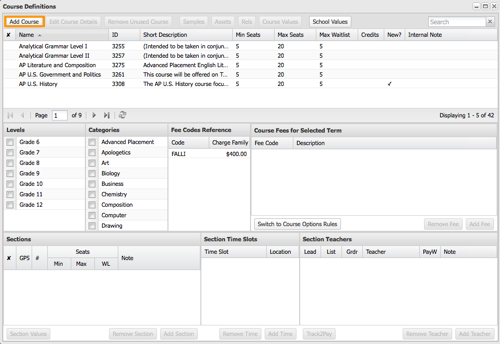
- Complete the form.
- Click in the New checkbox to highlight the course in course listings as New.
- The Minimum, Maximum, and Max Waitlist seats are default settings. You can adjust here or adjust at the section level.
- When you are done, click Add.
Then move to the next section down.
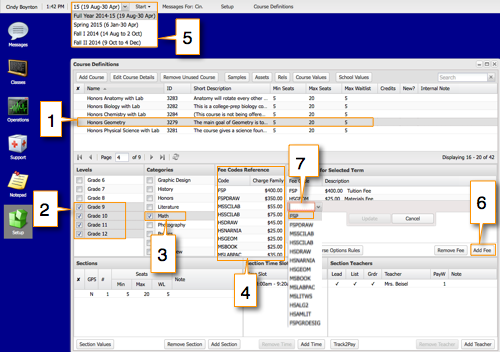
- First, make sure you still have the course you want to set up selected above.
- Then in Levels, choose the grade range for the course by clicking in the box next to the grade(s).
- You can then assign it to a Category of courses such as science or history.
- The column headed Fee Codes is a key of codes for your reference only.
- Up to this point you have entered generic course information that applies to the course in any term. From this point onward, your course set up will be term specific. (Note the section title, "Course Fees for Selected Term.") So click the down arrow to the left of the Start button and select the term that the course section you are setting up will be associated with.
- In the Course Fees section, click the Add Fee button.
- Click the down arrow in the Course Fee column to choose the fee that applies to the course and then click Update.
- Repeat the previous step if more fees apply to the course section you are setting up.
Then move down again.
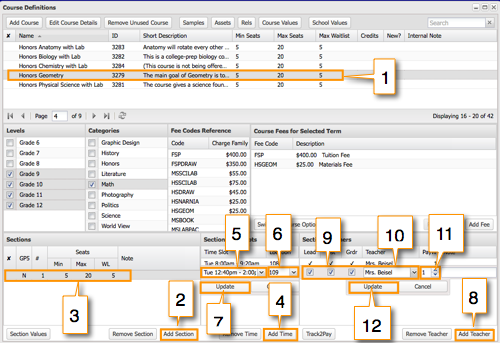
- Make sure you still have the course you want to set up selected above.
- Under Sections, click the Add Section button
- Adjust the default seat numbers as necessary by double clicking the line of the new section. Click Update when done.
- Under Section Time Slots, click Add Time.
- Choose the day/time period from the drop down list.
- Choose the room Location (if applicable).
- Click update. If the course meets more than once a week, choose the Add Time button again and enter another time slot.
- Under Section Teachers, click Add Teacher.
- Click the boxes under Lead, List, and Gdr if the teacher you are adding is the Lead Teacher, the Listed Teacher, and the Grader.
- Then under Teacher select the teacher in the drop down list.
- Then in payment weight you need to assign how much of the teacher share fee this person will receive. Think of it in terms of a percentage. You can enter 100, 75, 50, 25, zero or any other such percentage. For instance, the lead teacher may receive 75 and the assistant 25. If there isn’t an assistant, the teacher may receive 100.
- When you are done, click Update.
Note: Each section gives you the option of removing or deleting information. If you receive a message that you can not remove an item, contact your StudyPlace representative for more information. Once you are done going through this process for each of the courses downloaded from last year, you can add new courses by clicking the Add Course button at the top of the window.
Back to list of Set Up StepsStep 12: Email Templates
(Watch How-To Video #12:
Email Templates)
Part of the Set Up process involves creating email templates for automatic system delivery. To begin, login to the system with your credentials.
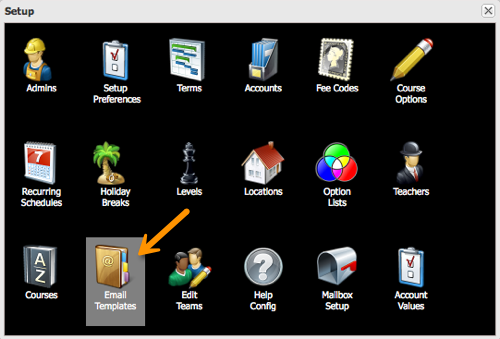
At the main desktop screen for administrative personnel, go to
Set Up and click
Email Templates.
Automatic email delivery system sends messages to various parties when families initiate certain actions in the StudyPlace system. When a family creates a new account, for example, the system is triggered to send out a New Account welcome email when the submit button is clicked. When administrative personnel set up the email they code it to pull certain information about the family from the database. For instance, the code can be used to insert the family’s name, email address, user ID number, how much they owe, etc.
You will find that your database already contains many templates for you to use. Please review the language in each template and edit it as necessary to match your organization's policies and procedures. (See instructions below for editing).
To edit an existing template:
- Click on a template in the top section of the window to read its content in the bottom section of the window.
- Edit language as necessary, but avoid changing the codes that appear with a $ and are surrounding by {}. That code is what will signal the system to pull personal information from the family's account. If you change this code, either at the direction of your StudyPlace representative or on your own, you must test it before using it. Please contact your StudyPlace representative for more on that.
- Click Update to save the edits
- Go back to the top half of the window and double click on the line of the template that you just edited.
- This will open the edit mode, where you can check the box in the "Active" column to activate it for use. If you decide not to use a template, do not activate it.
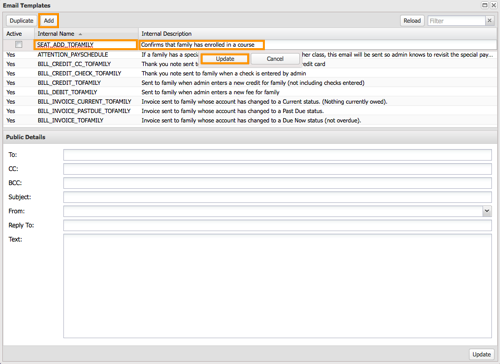
To add a new template (See image below):
- Click Add
- Click in the box in the Active column to activate the template; it’s best to leave it blank until GatherWorks has confirmed to you that it is ready to use.
- Enter an Internal Name for the template. It is important to use a naming convention for your templates. Start it with a broad category term and then use terms that narrow it. Use underscores to separate words. For example, I will be doing an email template that will be sent to families when an invoice is generated but nothing is due. So I would name it: bill_invoice_current_tofamily. Bill is the broadest category for the use case of this template then I narrow the terms to invoice, then to current (meaning nothing owed), and then I end it with the recipients. Please also note that the name for new templates should be in all lowercase letters.
- Then enter an Internal Description for the template. For this example I’ll use “Sent to family when invoice is generated and nothing is owed at this time due to credit or overpayment.”
- Then click Update.
- Once you have created a blank template, you can move ahead with composing the message.
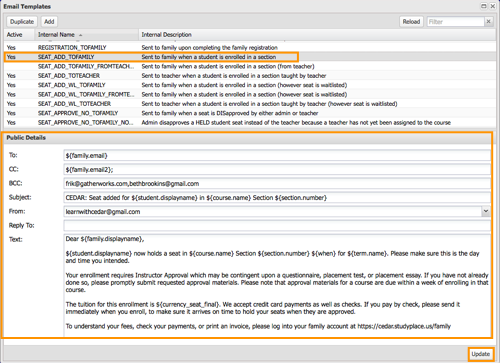
- Go to lower section
- In the To field, you’re going to enter information that will signal to us what you intend to go there. In this case use: [family email]
- In the CC field, enter [family alt email]
- In the BCC field, enter your own email address
- In the Subject field, enter the subject of the email but again use a standard convention here. Always start with your Organization’s acronym in all caps then colon. Then start -with broad constant description and narrow it. For example you can use “HHC: New Invoice” or narrow it further with “HHC: New Invoice Account Current for [family last name] Family”
- In the From field, enter your email or the school’s email
- You can leave the Reply to field blank or enter a person’s email that replies should be sent to
- Then you get to the Text field for the message. You can type or paste in text.
- When calling for something to come from the database like a name name in the greeting or an amount owed use square brackets to enclose it to signal to us to add the code
- Then click Update
If you have added new templates, alert your StudyPlace representative so codes can be added to them.
After completing your email templates, proceed to Step 13.
Back to list of Set Up StepsStep 13: Creating Family Service Jobs
(Watch How-To Video #13:
Creating Family Service Jobs)
Family Service Management starts with entering volunteer jobs. There are 3 steps to setting up a volunteer job:
For Step 1 go to Set Up and then click Recurring Schedules.
Here you define the time slot for all recurring volunteer roles. (This will populate a list of time slot options in the next step.)
To create a volunteer schedule:
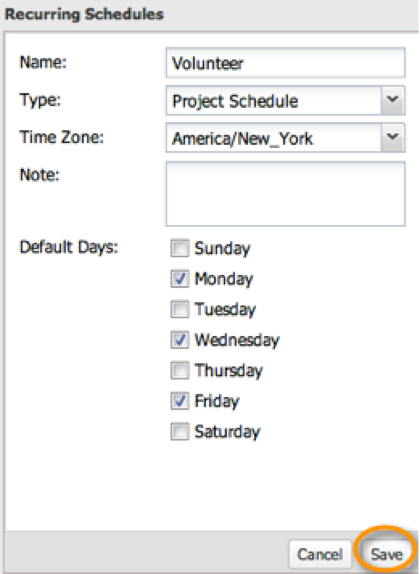
- On the left side of the window, click the New button.
- Then enter the Name of the schedule in the Type field select the schedule from the drop down list. Then click the boxes for each day of the week that your classes meet.
- Then click Save. That will generate another icon in the black field.
To associate time slots for the schedule:
- Choose that new icon in the black field
- Click Add Time Slot button below.
- Then enter the beginning and end time. Notice the days are already checked for you.
- When you are done with the first time slot click Update.
Repeat the process to enter all time slots.
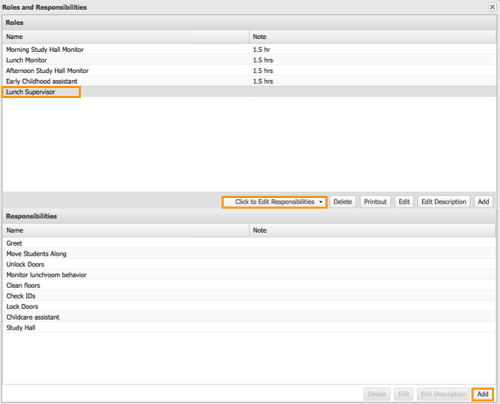
For Step 2, close this window and select Project Roles to define the roles and responsibilities for the volunteer jobs.Note:The Project Roles icon in the Setup Menu will only be visible if you have checked "Use Volunteer Jobs" on the Options tab in Setup Preferences.

Here you see the names of volunteer roles at the top and the responsibilities linked to each role at the bottom.
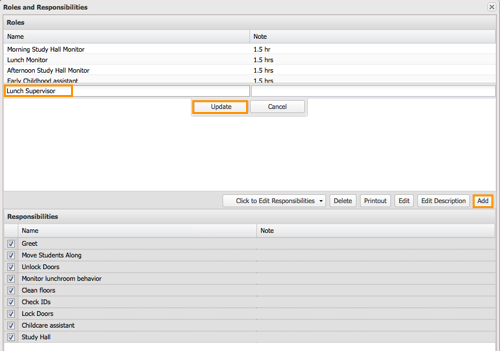
- Click the Add button in the lower right corner of the top pane of the window.
- Type the name of the volunteer role and the click Update.
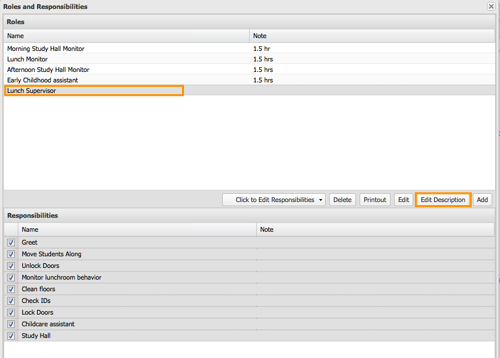
- Then select the role you just entered and click the Edit Description button.
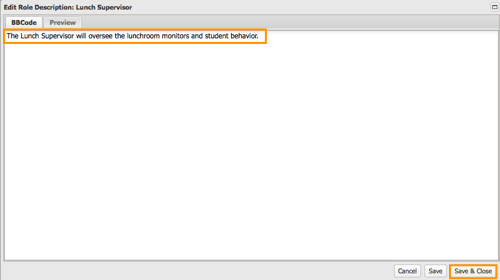
- Enter a description for the role and then click Save & Close when you are done.
- Then make sure the role you just added is still selected and click the button in the middle that reads Click to Edit Responsibilities. After that click the Add button at the bottom.
- Then enter a responsibility name and click Update.
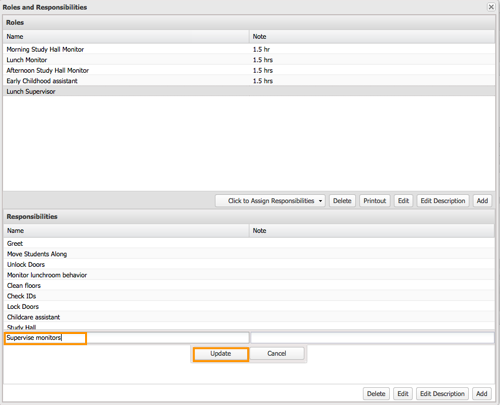
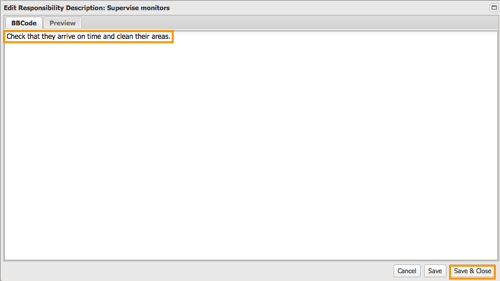
- Then select the responsibility you just added and click Edit Description in the bottom right hand corner of the bottom of the window.

- Then enter a description for that responsibility and click Update.
- Repeat for additional responsibilities.
- Making sure the role is selected in the top part of the window, click the Click to Assign Responsibilities button in the middle.
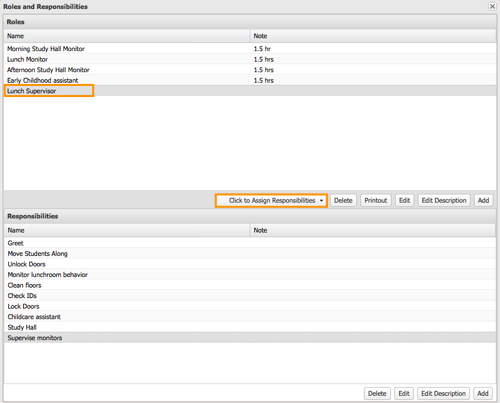
- Enter a checkmark in the box for each responsibility that you want to assign to the role.
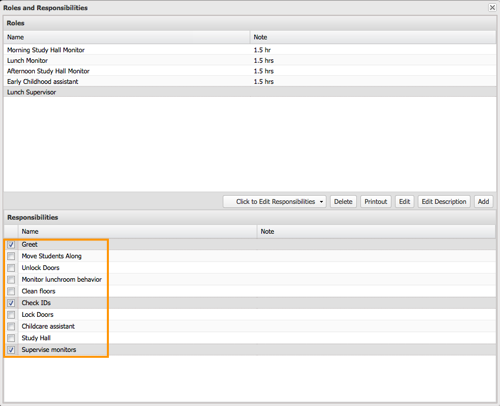
- By selecting a role above, you will see the assigned responsibilities below.
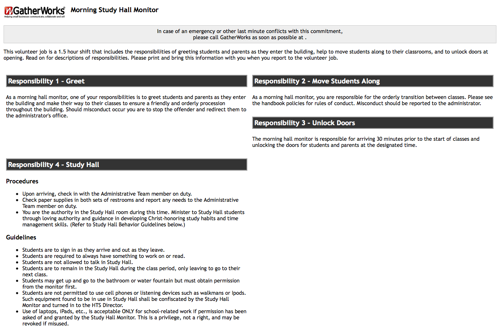
If you want to printout the Role and Responsibilities description, click the printout button. This will open an "Open URL" pop up box. Click the blue link.
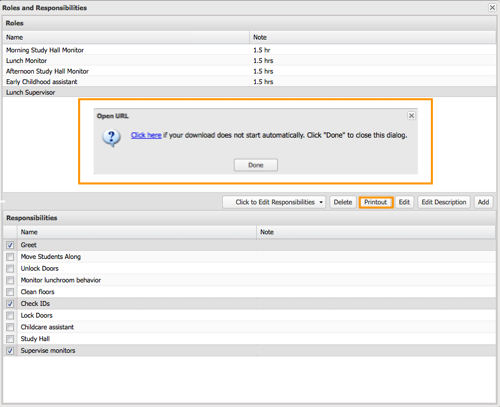
This will open another tab in your browser which you can then print out.
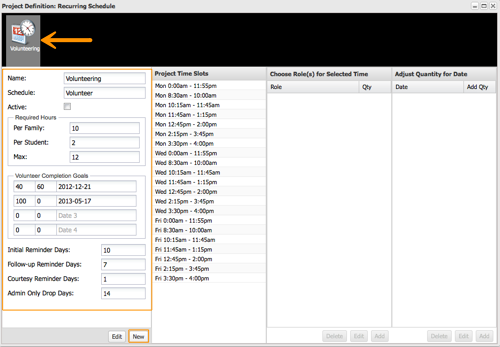
 For Step 3, close this window and select Define Projects to define what roles are needed for each recurring time slot.
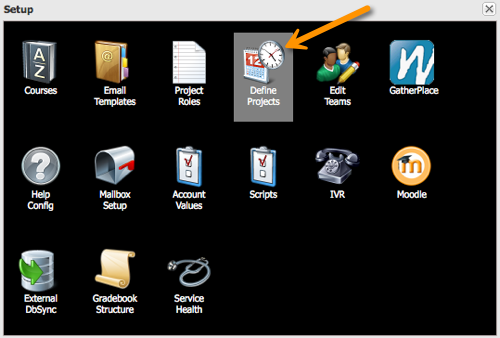
- Select the Volunteer Schedule at the top in the black field
- Click New at the bottom of the section on the left (button will change to read Save after you click it)
- Check Active to make the jobs visible to families.
- Then enter the required hours for each family, student, and maximum
- The Volunteer Completion Goals section is where you enter what your expectations are for how many hours should be completed at certain dates throughout the school year. For example, if your goal is to have families complete 50% of their hours in the first half of the year and then the other 50% in the second half, you can enter 40 in first box (no less than 40%), 60 in the second box (no more than 60%), and the date that coincides with the end of the first half of the school year. Then go to the next line and enter 100 (no less than 100%), 150 (no more than 150%), and the date that coincides with the last day of the school year.
This info will be used to generate a report for admin to check families to see who is on track for completing their required hours and who isn’t.
- Use Email Reminders to send families reminders of their commitments.
- For Initial Reminder Days, Enter the # of days before the job assignment that you want to start sending reminder emails and ask for a confirmation.
- For Follow Up Reminder Days, Enter the # of days before the job assignment that you want to follow up with another reminder if they did not respond to the first reminder with confirmation.
- For Courtesy Reminder Days, Enter the # of days before the job assignment that you want a reminder to go out (assuming that they have confirmed) with the job details.
- For Admin Only Drop Days, enter the # of days before the job assignment that families can no longer drop commitments themselves and instead must go to administration to drop it.
- Then click Save.
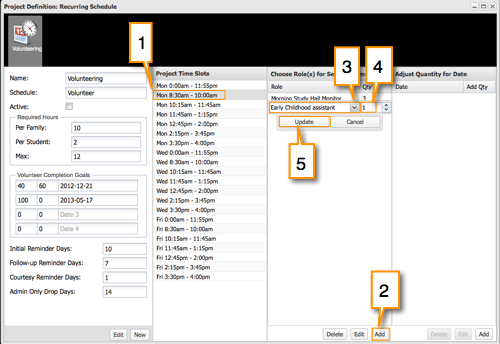
Then move on to linking time slots to roles.
- Select a time slot in the Project Time Slots column
- Click Add at the bottom of the Choose Role(s) for Selected Time Column
- Use drop down menu to choose what role you are adding for that time slot
- Then add a quantity for the number of people you need to be performing that role in that time slot. Click Update.
Repeat for additional roles for that time slot. Select another time slot to designate roles to that time using the same process.
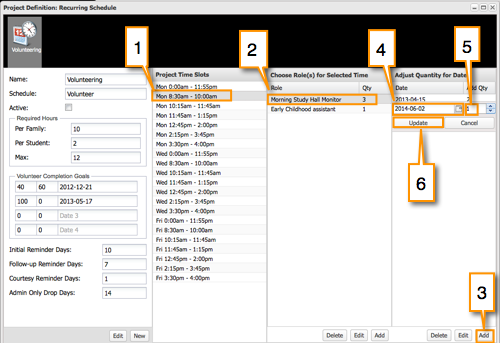
Now you can adjust the number of people needed for that role on a particular date.
- Choose the Time Slot in the 2nd column
- Choose the Role in the 3rd column
- Click Add in the bottom of the 4th column titled Adjust Quantity for Date. Use this if on a particular date you don’t need the same quantity of people filling that role in that time slot as prescribed for all the other dates.
- Choose the date in the calendar
- Enter + or - and the number or use arrows to adjust the number.
- Click Update.
When you have completed all 3 steps your families will be able to login and sign up for jobs and you can manage the Family Service sign ups. For more on that watch the How-To Video of
Family Service Management.
Back to list of Set Up StepsIf you’ve followed the set up process in order, you will now be ready to do some testing. Contact your GatherWorks representative to initiate a copy of your database to the Test Server. Then you will need to follow the
Publishing and Opening Enrollment procedures (see
this article) on the Test Server so that you can test your work. Refer to
this article for a list of critical operations to test. Once you are satisfied, you will need to repeat the Publishing and Opening Enrollment procedures on the Production Server.