Getting Ready for the New Academic Year
Somewhere in the midst of your current academic year using StudyPlace, you will need to begin prepping the system for the new academic year. This article is intended to provide you guidance on what to do.
There are five phases involved in the transition from one academic year to the next within StudyPlace:
- Ending Enrollment for the Current Year (If this is your first year with StudyPlace, you can ignore this step.)
- Prepping for the New Year (If this is your first year with StudyPlace, please skip this step and use the Reference Guide for configuration instructions before moving onto the next two steps.)
- Publishing Courses to Course List
- Opening Enrollment for the Next Year
- Closing Grades and Student Submission
Refer to the guidelines below for what to during each phase.
Note:The "Account Creation" option in the Operations sub-menu Open Enrollment can be enabled or disabled anytime throughout the year to allow or restrict families from creating accounts.
Ending Enrollment for the Current Year
To Remove the "Enroll" icon from the family desktop:
- Go to Operations and then Open Enrollment
- In the "Family Options" section on the left, click in the "Show Enroll" checkbox to uncheck it
To Remove the "Show My Cart" icon from the family submenu of "Enrollment Manager":
- Go to Operations and then Open Enrollment
- In the "Family Options" section on the left, click in the "My Cart" checkbox to uncheck it
To Disable the ability of new families to create an account by removing it from the login screen (optional)
- In the "Family Options" section on the left, you can choose to enable/disable the "Account Creation" portion of the family login screen by checking/unchecking the box.
Note:If you choose to keep this option enabled new families will be able to create an account, but they will not be able to view courses or enroll. If you disable this option, new families will not be able to create an account and only those families who have already created their account will be able to login.
To Change the Status of Courses Published in the Course List and in the Operations View:
- In the "Enrollable/Published in Course List/Operations View" section on the right, double click the line of the term that you want to close enrollment for
- Click the "E" (which stands for Enrollable) checkbox to uncheck it and then click "Update"
- Repeat the previous two steps for every other term in the current academic year
To Prevent the Completion of the Enrollment Process:
- In the "Family Groups Allowed to Complete Enrollment" section at the bottom, double click the first line to open edit mode, then click in the "Open" checkbox on the left to uncheck it and then click "Update"
- Repeat the previous step for all the lines in this section
All the actions above will prevent families from enrolling in any more courses for the current year.
Prepping the Next Year
(If this is your first year with StudyPlace, please skip this step and use the
Reference Guide for set up configuration instructions. Once you have completed that process you can move onto the next step.)
Terms
- Go to Set Up and then Terms
- Add a New Academic Year
- Add new Terms for the Academic Year
-Be sure the start/end dates on terms are accurate to ensure that teacher pay and LMS functions work correctly
-Change the LMS Staff status to "Edit (Hide Dates)"
-Change the LMS Student to "Hidden"
- Add new Payment Schedules for each Term
- Add new Payment Dates for each Payment Schedule (Be sure that the percents for all payment dates in the payment schedule add up to 100%)
See Terms Set Up in the
Reference Guide for New Schools to review best practices for configuration of these items.
Classes
For Admin:
- Go to Classes
- Enter a course in the new term, select the "Course" tab, click the "Copy from Previous" button
- Repeat for each course in new term
This will copy the course Resources and Topics & Objectives from the previous term to the new term so that teachers can edit them appropriately for display in the course list.
For Teachers:
- Admin should instruct teachers to edit the Resources and Topics & Objectives for each course they are teaching in the new term
- Teachers should login and enter a course they are teaching in the new term, select the "Course" tab, and edit
- Repeat for all courses they are teaching in new term
This will prepare the course information for display purposes in the course list.
Fee Codes
- Go to Fee Codes and add new ones for the new terms you added (Be sure to select the new term before adding a fee code)
See Fee Codes Set Up in the
Reference Guide for New Schools to review best practices for configuration.
Holidays
See Holidays Set Up in the
Reference Guide for New Schools to review best practices for configuration.
Teachers
- Update teacher contact information and bios as necessary (Updates will take effect immediately.)
- Add new teachers and leave the display column blank until you want the bios to show on your course list
- Disable teacher accounts for those who will not be teaching anymore and uncheck “Display” column when you want to remove their bios from the course list
See Teachers Set Up in the
Reference Guide for New Schools to review best practices for configuration.
Courses
- For minor changes to course descriptions, edit as necessary using the “Edit course Details” button in the Course Definitions window. (Updates will take effect immediately.)
- For significant changes to course descriptions, create a new course using the “Add Course” button in the Course Definitions window. Name the new course something similar to the original course, but make sure the name will be recognizable to you as the new version of the course.
- Also use the “Add Course” button for brand new courses and be sure to check the “New” box to highlight the course in the course list. Then proceed to entering a grade level range and category for the new course.
- Select a term in the new academic year
- For each course being offered in the term selected, determine if a new fee code should be associated with it and then create sections, time slots, locations, and teachers
- Then repeat the two previous steps for all the other terms of the new academic year
See Courses Set Up in the
Reference Guide for New Schools to review best practices for configuration.
Miscellaneous
There could be other changes that are necessary if your organization intends to implement new policies that affect tuition and fees, teacher payment, dropping courses, etc. Also, if you intend to use a new component of StudyPlace for the first time (Learning Management System, Online Classes/GP5, Volunteer Management), further set up work will need to be done for that new component. Consult the
Reference Guide for New Schools to review best practices for configuration of new components.
Publishing Courses in the Course List
- Go to Operations and then Open Enrollment
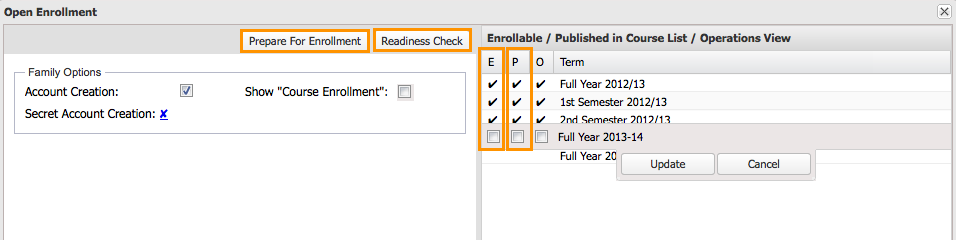
- In the "Family Options" section on the left, click the button labeled "Prepare for Enrollment"
- In the same section, you can choose to enable/disable the "Account Creation" portion of the family login screen by checking/unchecking the box. (Keeping this option enabled will only allow new families to create accounts. They will not be able to view courses or enroll.)
- In the "Enrollable/Published in Course List/Operations View" section on the right, double click the line of a term in the new academic year
- Click in the “P" (which stands for Published) checkbox to check it and then click "Update"
- Repeat the previous two steps for each term in the new academic year
- Then go to your Course List webpage and check that your courses, sections, teachers, schedules, tuition, and assets are appearing as you want them to for each of the new terms that you published
Note:This will publish the course offerings for the new academic year in your course list to allow families to start shopping for the next term. Publishing this information and enabling account creation will not allow enrollment.
- In the "Enrollable/Published in Course List/Operations View" section on the right, consider which term(s) in the new academic year that you want to open enrollment for. Double click the line of the term in the new academic year.
- Click in the “E" checkbox to check it and then click "Update"
- Repeat the previous step for any other terms you may want to open.
Note:This will make the terms available for families to add to their cart.
Readiness Check
At this point, you should do a Readiness Check by clicking the button "Readiness Check." The system will perform a check of your configuration to determine if certain basic criteria has been satisfied. A list of missing information or issues that need to be corrected will appear here. For example, if a teacher hasn't been assigned to a section yet it will be listed here. It will not prevent you from publishing course materials or opening enrollment, but it is best to try to clean this list up as much as possible before hand. You can click "Readiness Check" as often as you like from here on out to see what is still outstanding.
Testing
(Refer to
this article for more information.)
- Contact GatherWorks and request that they copy the production server data to the test server so that you can test the configuration of the new academic year.
- After the Test Server has been updated, you'll need to follow the Opening Enrollment for the New Year steps (see below) on the test server only so that you can test the enrollment process. Then go to the Family Login page (the URL will end in /family) and create a new Test account using the "First Time" section of the Login screen. Follow the family account creation and enrollment process for several courses. Then logout as the family.
- Go to Test Server login screen for Admin and use your Admin credentials to login.
- Make sure everything is working as expected especially for any new components you may be using. Please allow for at least one week of testing before opening enrollment. Refer to this article for a list of critical operations to check.
Note:Production Server data gets copied onto the Test Server every couple of days. If this happens while you are testing you will lose all your test data. So to prevent the loss of test data, contact GatherWorks and tell them not update it until you are done testing.
When all testing is successful, go back to Production Server and follow the instructions for
Opening Enrollment for the New Year that appear below.
Opening Enrollment for the New Year
Note:Steps 1-4 can be done prior to the official open enrollment date to allow families to do the bulk of their preparation work for enrollment. Families can leave courses they have pre-selected in their cart until the date that enrollment opens for them.
- Go to "Operations" and then "Open Enrollment"
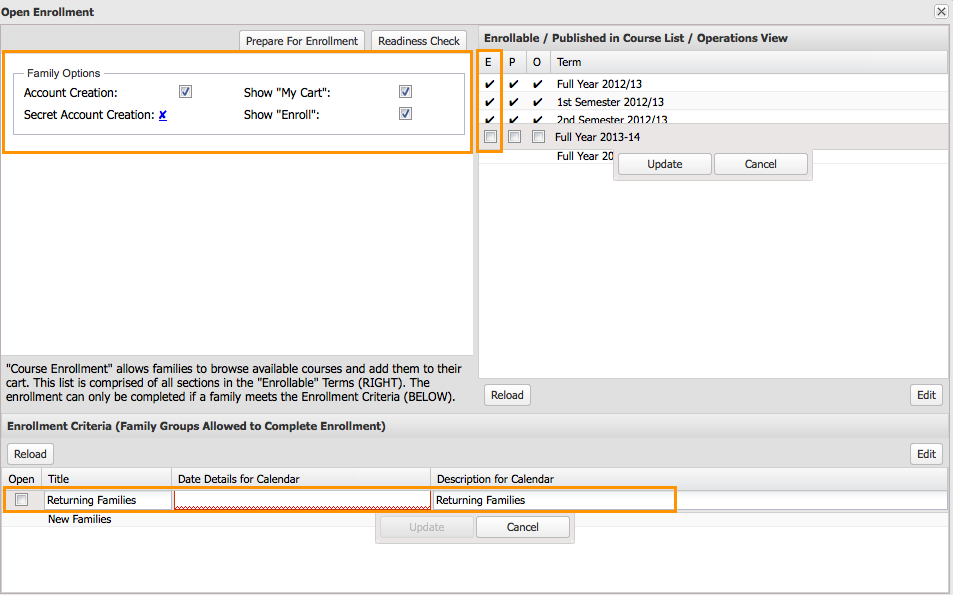
- In the "Family Options" section on the left, click in the “Show My Cart" checkbox to check it. (This will make the "My Cart" icon appear in the family Enrollment Management menu so they can access the course selection window.)
- Also in "Family Options" section on the left, click in the “Show Enroll" checkbox to check it. (This will make the "Enrollment" icon appear on the family desktop so they can access the course selection window and enroll.)
- In the same section, check "Account Creation" if it is not already checked.
Some schools will stop at this point until they reach a specific open enrollment date for one of their enrollment groups (i.e. returning families, teachers with students, new families). At the appropriate time for the first enrollment group, proceed to steps 4-9.
- Go to Operations and then Open Enrollment
- In the "Family Groups Allowed to Complete Enrollment" section at the bottom, double click on the line for the group that you want to open enrollment.
- Click in the "Open" checkbox on the left (This will allow families that meet the criteria for that enrollment group to complete the cart checkout process.)
- Enter information in the "Date Details" section (What you type here will be used on your calendar page if you use the StudyPlace calendar)
- Click "Update"
- Repeat the previous steps each time enrollment opens for one of your enrollment groups.
Note:When following these steps on the Test Server during the testing phase, it is important to open enrollment for each enrollment group in the order that they will be opened in reality. For example, test with first enrollment group open only. Then test again after opening the next enrollment group and so on for any other groups.
Closing Grades and Student Submission
- Go to Terms, select the academic year you are ending, select each term in the year (one at a time)
- Change the LMS Staff status to "Final"
- Change the LMS Student to "View Only"