StudyPlace features a helpful automatic email delivery system designed to save administrative time and provide clear communication with families.
There are certain actions that families or administrative personnel initiate in the StudyPlace system that are coded to trigger automatic emails. When a family creates a new account or administrators approve seats for example, the system is triggered to send out emails to confirm a transaction has taken place. The automatic emails are coded to pull certain information about the family from the database to personalize the message. For instance, the message may contain the family’s name, email address, user ID number, how much they owe, etc.
During a school’s initial set up, all templates will need to be modified to include the proper email addresses for your organization as well as language that properly reflects your school’s policies. For planning purposes, please note that this process has taken other schools 15-20 hours to complete.
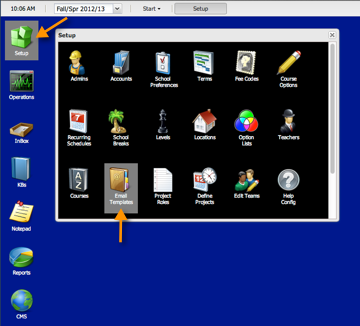
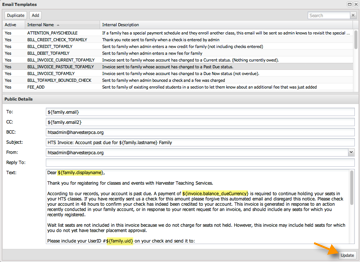
To view the templates that are available, login to the system with your administrative credentials, go to Set Up and click Email Templates. (See below)
The list of templates are contained in the top section. Scroll down to view them all. (See below)
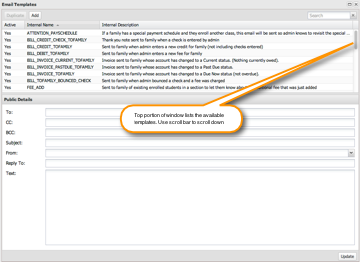
Select a template in the top section to read the message in the section below.(See below)
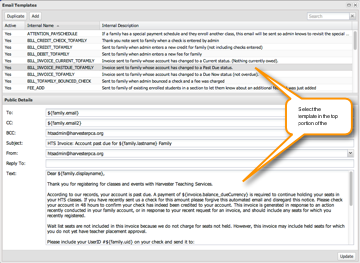
To modify a template,
- Select it in the top section
- Then make edits to the message below
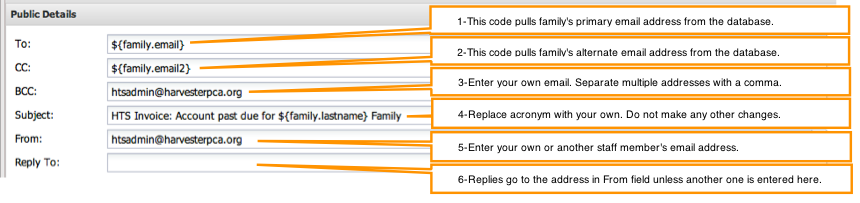
- In the To field, you will see this code which simply tells the system to pull the family’s primary email address from the database (See #1 below)
- In the CC field, you’ll see similar code for the family’s alternate email address (See #2 below)
- In the BCC field, it is a good idea to enter your own email address here at least in the beginning so that you are aware of what is being sent out. Separate multiple addresses with a comma. (See #3 below)
- The subject field of every email uses a standard convention. It starts with the Organization’s acronym in all caps followed by a colon. You’ll need to replace the placeholder acronym for each email template with your organization’s acronym. Keep the rest of the description as is. Note, that the description starts out in broad terms and then narrows down to specific family terms which makes it easy for families to filter their emails. The descriptive nature of email subject lines are also helpful when they appear in a family’s timeline. (See #4 below)
- In the From field, enter the appropriate email address for your organization (See #5 below)
Note:To prevent the email from being blocked, be sure to use an email address in the From field that comes from the school's email server (a domain that the school controls). Email addresses that end in yahoo.com, gmail.com, etc should not be used in the "From" field, but can be used in the "Reply To" field if necessary.
- If replies should be sent to an email address other than the sender's address, enter it in the "Reply To" field. For example, most schools send all their emails from the school administrator, but replies for some emails are directed to teachers using the "Reply To" field. (See #6 below)
- Next you can edit the language in the message field. In the example below you can see the codes (highlighted) being used to pull the family’s name, invoice balance due amount, and family User ID number from the database. Contact your GatherWorks representative if you would like to add other information from the database in the message. You can also add URL address which will become clickable links or attachments. When you are done editing, click update. (See below)
If you need assistance or would like to access additional database information, contact your GatherWorks representative.
All email templates are Active by default as evident by the Yes in the Active column. If the active column of a template is blank than the template is deactivated and will not be sent out. (See below)
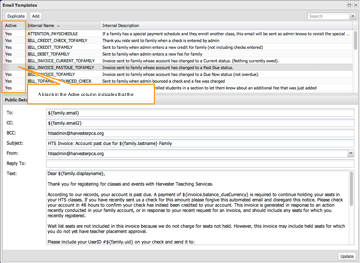
To deactivate an email template,
- Double click the line of the email name in the top section (See below)

- Uncheck the box in the Active column and then click Update. (See below)
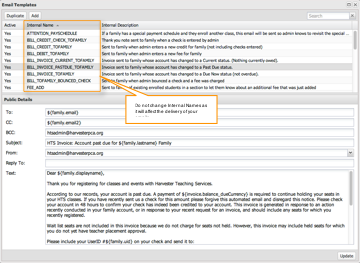
Caution: Do not change the internal name of existing templates since it will interfere with the delivery of your messages. (See below)
After editing the email templates and deactivating the ones you don’t want to use, you’ll be ready to do some testing to check your work. Contact your GatherWorks representative to proceed.